Sunday 30 September 2012

Lovely new toys

I had a big parcel of goodies arrive on Friday and then on Saturday I had some new T!m dies turn up too!  All very exciting - the goodies aren't just for me though as I have been busy shopping and preparing for some new workshops I would like to run during October/November.

Here are two cards that I have made so far:


The outside of the Christmas Door card - yes that wreath is from the new T!m Noel Ideaology set and yes that brick wall embossed background is new too.

Then the inside:


has one of T!ms new Christmas stamps on it! Yes I have a set of those too - told you it was a big box full of goodies didn't I!

The next card I have made is:


which has an alcohol ink resist background, the new T!m on the edge Christmas Tree die (that was in my second parcel) and a new T!m Christmas stamp from his mini holiday set too.

Last, but certainly not least, is a tag I have done which uses the technique of marbled stains:


here I will show you the technique of Marbled Stains and how to dye your ribbon to co-ordinate.  On this tag there are T!ms snowflake stamp, a piece of Noel ideaology, a Noel Christmas muse token along with two of the 3d snowflakes - how much new yumminess can you get on one tag!  Whoo hoo!

If you would like to reserve a place on a workshop, as places are very limited, please email me and I will get in touch when I have finalised the details.  The card/tag workshops should be about £10 each and will probably be held on a Monday from 10.00am at Earlswood Craft Centre - I'm afraid I can't finalise details until the end of this week but I wanted you all to see a quick snippet of some of the new stuff.  Details will be shown via the What Housework blog soon too.

Also starting tomorrow is the fabulous "Leafs Me Happy" quilting blog hop - and I will be showcasing my quilt on the first day too!  Here is a little snippet for you:


this was a lovely project to work on, and now I have another small quilt to add to my ever increasing collection!

Thanks for looking - all shopped out from Solihull

Monday 24 September 2012

Tims September Tag

Here is my tag for T!ms September tag challenge and I will also enter it into the CCC2 challenge which theme this week is also Riveted Patchwork:


I found this months challenge a big challenge to keep to my British theme - I spent two weeks trying to work out how to make the patchwork look like a London Bus (yes honestly - mad I know! but luckily all designs were kept in my head and I didn't put pen to paper and waste too much time), anyway after two weeks of pondering I decided to scratch that idea and keep with the good old Union Flag as my background.

Here is the base of my tag before I added the embellishments:


all metal applied and:

then the piece trimmed and etched with my metal tools (never been used and I have had them for about a year - oops!).  Then imagine the horror when I turned the tag to start positioning the embellishments to realise that I had done the flag upside down!  That would never sit well with me so rather than redoing the whole thing I just took off the four small pink pieces and repositioned them - phew quick fix there!

I then added Oregano and Slate alcohol inks all over and then burnished the tag with a steel brush - I didn't over burnish as I wanted to leave some of the colour even though I had used pink and light blue - just to make the fact that it is the Union Flag stand out after the embellishments had been added.  I then wanted to use an English quote of some kind on the paper but I still can't bring myself to cut up my extra copies of Harry Potter or the Gruffalo (fabulous artwork for backgrounds in that) so I printed out the lyrics to "Made In England" by Elton John inked it with Old Paper and Vintage Photo and adhered it to the tag with my trusty T!m stapler - I kept the typewriter much the same as T!ms as I loved the effect with my sheet saying "Made In England" too.  I then added some metal cogs, spinners and brads inked in Denim, Snow Cap and Red Pepper alcohol inks and layered them into sets of red, white and blue colours, added the film strip ribbon and pen nib after I had written "Elton" and put a blob of black ink on the end of the nib.  To finish I decided to use a metal chain rather than ribbon and added some red, white and blue pins with red, white and blue beads (again dyed with alcohol inks) and then a metal heart inked with Red Pepper alcohol ink and metal tag inked with Snow Cap alcohol ink.  I love the way you can still see the flag in the background even though the ink took some of the colour off the pink metal - I also omitted the metal numeral to showcase more of the background but other than that I kept the embellishments pretty much the same as T!ms this time as I liked them so much.

If you would like to join in the challenge over at T!ms go here and if you would like to join in with the technique over at Studio L3 which is the Compendium of Curiosities Compendium 2 challenge no. 22 then click here.  For the CCC2 challenge you need to use the technique on page 57 of T!ms book, post without giving away all the technique details and also say that the http://www.TheFunkieJunkie.com are giving away a $25 shopping spree prize then add your link to the inlinkz provided.

Can I just say a big hi to my newest follower Daryl and then that's all from me on this very rainy morning in the UK - makes a change from all the sunshine we have been having doesn't it!

Thanks for looking - Rained In from Solihull

Saturday 22 September 2012

Quilt hop giveaway

Morning everyone, I want to post the winner for my 20 handmade flower giveaway - I had 117 comments! wow thank you everyone so much for commenting on my blocks - sorry I didn't email you all back but I have been a bit busier this week.

Anyway I have chosen the winner by using random.org which is:

which by my reckoning after taking out duplicate comments is:

*       patchouli moon studio said...

*       You certainly were a busy gal. I like those die cut flowers. I think your first block with the dots and stripes needed perhaps a bit more contrast with the colors as it needed something to make the block pop a bit more. I think we all have trouble with matching points at times...that's where you can get creative and add touches of applique or buttons to place on those not-so-perfect points. It is a nice block. 

congratulations and thank you for your lovely comment.  You have won this selection of handmade fabric flowers:


or I am happy to switch some to crocheted ones if you prefer.  This is the pile I have managed to amass this week:


I have managed to try another pattern now so I am up to three types!  tee hee - keeps me busy now the nights are drawing in!

I would also just like to say a big hello to my two new followers Charlie Alexander and Kay - thank you both so much for following me - having followers makes my blogging worthwhile!

I have also managed to do T!ms September tag this week but I will blog about that on another post - I will leave you all with this picture of little one with the Mayor of Solihull yesterday:


whoo hoo - it all happens here!

Thanks for looking - Crochet mad from Solihull

Wednesday 19 September 2012

WOYWW 172

Hi everyone *big wave* not joined in for a while and I really have missed you all and having a good nosey around.  My desk/dining room table is a real mix of clutter at the moment:


where to start?  bottom to top I guess - there are a few of my new dylusions sprays that I got on Sunday - thought I would find out what the fuss was all about and I have only tried two (the two at the top of the table) and they are lush and the colours are so vibrant so well worth it! That blue thing to the right is a spade handle which I was trying to paint grey to go with my tombstone (on the left) but it didn't go to plan so I haven't used it.  Then to the left is my tombstone which I managed to finish and blog about on Monday but haven't moved to the lounge yet (it's for October) after that is my WOYWW badge to wear at the NEC in November - whoo hoo. 

That large sizzix die is under a pile of new stamps that I got with my winnings from T!ms august tag challenge (little toot toot for myself there!).  The washing up bowl is my new "Spray Station" I bought it as I taught a class of tags on Sunday but I ended up just walking around the room all day with all my bits and bobs in it and everyone thought it was a sick bucket instead!  That gun is so not mine! never sure where these extra things come from (the pencils arent mine either!).  The stamps at the top right are my new T!m halloween ones that I got on Monday (they are part of the winning shop too) which enabled me to finish my tombstone - the pile of magazines next to the pc are the last three issues of Scrap 365 that I still haven't read and some books on how to drawn Disney/Beano characters (planning to go into school and teach some children how to draw! gulp - wish me luck!).

I have angled my photo this way so that you can see another new lovely purchase - my birdcage!  isn't it fab it was only £15 from the Range and is going to slowly house all my latest tags - three of them on there have been done in the past two weeks so I have been busy getting very creative here - it's lovely when your mojo is back isnt it!

If you want to know why I am baring my workspace to the world then pop over to Julia's for all the details and you can even join in the fun too! be warned though it's very addictive......

I would also like to say a big hello to my new followers:  Kathy H, Judith, Evelyn, TheMugglePuggle, Farm Quilting, Quilt n Queen, Susie Q, Legato, Kathy, LeliaEvelyn, Susan, Linda, My Crafty Shed and CeLynn - I think most of you have joined me from the quilting blog hop (hasn't that been such fun!) and also a big thank you to all for following me.

That's it from me - thanks for looking - off to catch up with desks around the world from Solihull

edited to add: It must be summer as I have hung some washing on line!

Monday 17 September 2012

A grave tale

Imagine my excitement when today the postman delivered my winning stamps from T!ms August tag entry - I have spent a few days preparing a some configuration boxes to do a kind of advent calendar thing for the boys during October for the run up to Halloween, and here is my finished masterpiece:


Starting on 20th October they will be able to open a box each day and share goodies or tricks between them - I will fill the boxes with sweets or jokes and, maybe just maybe, I might put in one of the boxes that they both need to go and tidy their bedrooms - he he he.

Anyway I used two configuration boxes that I painted dark grey, then stippled with white acrylic paint and inked with Iced Spruce distress ink.  The top part is done by using five pieces of card bent to shape, covered with a piece of white muslin inked with Iced Spruce distress ink.  I added the witch by using T!ms mask and Black Soot distress ink - then I cut out all my letters, the rickety house, ghosts, spider, skull, bats and graveyard (which arrived last week) and then waited for my stamps to arrive.

As soon as I got home from the gym this morning they were there and obviously I have ignored all the housework and other things I should have been doing and got on with this!  I stamped all the images I wanted with black archival ink, cut out and inked all the leaves (using T!ms Autumn Gathering sizzix die) and then stuck everything together.

Here are some closeups:


the graveyard at night......  spooky


the rickety house, lots of ghosts in there and just like the Haunted Mansion in Disneyland always room for one more!


and here is the witch flying across a pumpkin patch - the pumpkins I made from little polystrene balls that I squished down and put lines in with the edge of a piece of card and then inked with Spiced Marmalade distress ink, finished with bits of green inked branches from the Autumn Gatherings sizzix die.  The spider and ghosts are by Quickutz all other dies are by T!m.

Obviously I wouldn't have slept at night if the back was left bare (can never resist filling a blank canvas with something me!) so I decorated that too:


the bones are handcut from white card and inked with Antique Linen and edged with Iced Spruce - the lines I drew with a Wethered Wood distress marker.  The letters are from T!ms alphabet die and the stamps from my new Mini Halloween collection - ideally I would have liked to use the new halloween sizzix strip die of people but that's not available in the UK yet :(

Hope you like the name of the chap buried under this tombstone - I spent a few hours searching for funny names too - believe me there are some funny graves out there.

Anyway that's it from me today - off to go and do something I should have done earlier....

Thanks for looking - All Spooked Out from Solihull

Tuesday 11 September 2012

Dots on Dots Blog Hop

It's my turn - whoo hooo!

How much fun has this theme been! Have so enjoyed myself although I did lose my mojo half way through (and also had the children at home and went away for a couple of weeks) so I didn't produce as much as I thought I would but I am still pleased with my creations.

Firstly I made this:


my plan was to make about a dozen of these and make them into a quilt but I didn't like this in the end so didn't make anymore.  I am not sure whether it's the colours and there is too much white (I then went out about bought all the grey and blue spot you can see on the flowers below but never regained my mojo for carrying on with these blocks!).  Or whether it's because I am too fussy and can't get perfect points:


see in the middle there and to the bottom left of the bottom left spot?  Am I just been too fussy?  I used a template to cut out all the pieces and 1/4" foot so in my eyes they should all be perfect.

Anyway with that project now cast aside I decided to do some beach scenes (having just come back all inspired from our lovely Devonshire coast), and made these:


The beach material is a fat quarter I have had sitting in my stash for ages and the blue sky is an old shirt! Like a bit of upcycling me!  and then here is one done in my bright materials:


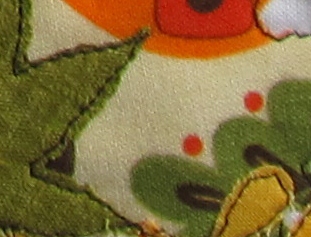
Then as I am going through a flower making phase (see previous post) I made this:


and then I completely lost my inspiration and couldn't muster up the energy to produce another beach quilt (was planning one with a row of beach huts and another with a boat on the sea in my mind) so I did what always cheers and motivates me and got my sizzix dies out:


these are from T!ms tattered flower die.  I was going to put all the rolled rose flowers on the top but decided it was all too bulky so opted for buttons instead.  I have also made another quilt but have decided to try and see if I can get it published as I haven't been showcased in a sewing magazine yet and there is a new one produced here in England - but again that's a job for another day!

All blocks are left unfinished as I loved the idea of Madame Samms of joining them all into a quilt although knowing me they will be added to the UFO pile for a while as I am in the next two blog hops too!

Anyway if you have perserveered through all my ramblings to here - well done! sorry for whittering on but to reward one of you I would like to do a giveaway of 20 handmade flowers - in the spotty colours above or I could swap a few for crocheted flowers if you prefer.  Giveaway is open to anyone who comments on this post and I will pick a random winner on the 22nd (day after the last day of the hop) and will post anywhere in the world.  You don't have to be a follower but I would love it if you were!

Thanks for joining me on my blog hop day the rest of today's schedule is:


and the full schedule can be found here on the lovely Corrie's blog.  A big thank you to both Madame Samm and Corrie for organising this hop.

Thanks for looking - Definately dotty from Solihull

edited to add a tutorial for the kites:

Step 1: Get some lined paper and draw a straight line vertically on the page, use a 2B pencil as these show through your bonding paper well:


Step 2: Next I estimated approximately how big I wanted my kites (I don't do strict measuring - far too time consuming!) and I decided I wanted the long sides to be about 10 lines in height and 2 inches wide at the widest point, so I draw a horizontal line across at the 10 line height


Step 3: then positioned my ruler like so:


where the 1 inch cross square met the line is actually 11 lines up from the bottom point and the ruler is angled so that the inch point hits the 10th line, then draw your next line from the bottom point up the 10 line mark.

Step 4: Reposition the rule on the opposite site and match up exactly as before and draw your line:

you are left with this shape:

which should be perfectly symmetrical!

Step 5: reposition the ruler to the height you would like the top part of the kite to be - I decided up 3 lines high:

and draw your next line:
repeat for the other side:
voila - a perfect kite!

Trace this through onto Bondaweb (the English version of double sided heat and bond I think) and then iron onto four pieces of material, position on your block and iron in place.

I then simply sewed around the outside of the whole shape starting at the top point, when I returned there I turned the quilt and sewed a line from top to bottom directly through the centre, turned the quilt again and retraced the line up to the widest (10th line) position (this was all done by eyeball no strict measuring involved!) then I sewed across to the left, turned and sewed all the way over to the right, turned again and sewed back to the middle.  Then I sewed back up to the top and all around the whole kite again.

To add interest I sewed wiggly lines from each deckchair to a kite - the children can now play the game where they have to find out which kite is being flown from which deckchair.  To finish I cut strips of each fabric approx 1.5" x .5" sewed up the middle by hand and gathered it so it looks like a bow, then sewed it on a flag bottom - normally I would do three bows per kite but as I have made my quilts into little puzzles I decided to stop at one otherwise the quilt would be far too busy.

Hope this helps! sorry its all written in a rush before my school run so I hope it makes sense!


Sunday 9 September 2012

Busy with a crochet needle!

I have finally cracked crochet - at least I think I have.  Been trying to teach myself for ages but as soon as I got to grips with it the project would be put to one side whilst I got on with something else and then when returned to it was all forgotten!

But last Thursday I made myself sit down for two hours in the quiet (no children here!) and perserveer with it.  Here are some of my results:


believe me there are loads more!  I have pink ones, rust coloured ones, more blue and grey ones - in fact lots of them!  I have only managed to get to grips with these two patterns - I printed some more off the internet but they all look a bit confusing so whilst sitting in front of the telly the past three nights I have just got on with the above two types with any bit of wool (or twine or string!) that I can find without going up into the loft where I have bin bags full of wool.  The twine and string ones look nice but did make my finger sore so I don't think I will be doing any more of those - just need to make some fabulous tags or layouts to use them on now!

I have also been busy making material flowers:


have lots of these in different colours too - the round ones are just twisted strips of fabric held together with my glue gun (I still have a blister on my little finger to prove it! the things we do for art eh!) and the shaped ones are done with yoyos.  So glad I invested in these as I wasn't sure if they would be a waste of money but they are so simple and quick to use, and these ones I actually took on holiday and made whilst we were sitting in the hotel room on an evening (sold my sidekick so couldn't sit and cut out lots of dies as my OH won't let me take the bigshot (spoil sport!)).

And then finally I have got to make one of these:

been meaning to make these for ages now - I bought a bag a couple of years ago which had one on (although annoyingly no instructions for it in the pattern I bought), so I have had the bag done since then but no flower on (obviously have now lost the material in the depths of my sewing cupboard too!).  Anyway whilst in the States I decided to buy the pattern as it was only $4 - I knew I didn't necessarily need it as the petal shapes are a simply handdrawn onto freezer paper and the edges sewn around and gathered together but I thought it might actually spur me on to produce one if I had the pattern sitting there on my "Things To Do" pile - and as you can see it did.  Only made this one (or two if you count the two sizes!) but do plan on making many more.

Anyway this has all been done whilst I have been busy beavering away on my quilts for the Dots on Dots blog hop.  The hop starts tomorrow and the full schedule is here my showcase day is Tuesday and you can tell from the above flowers what colours my dots are!

Thanks for looking - going dotty from Solihull

Friday 7 September 2012

Anniversary card

Both my parents and my OHs parents have the same anniversary (5th September) - I usually make them both different cards but this year what with new schools and everything I decided to create two the same to save time:


I used a Kraft card base, T!ms Journey Sizzix mover and shaker tag with a bazzill tag, small butterfly mover and shaker, Antique Linen, Frayed Burlap and Barn Door distress inks, Coffe and Crimson Archival inks, the Butterfly stamps are by Cavallini and Co, the background script stamp is by Kaisercraft and the LOVE and small script are from T!ms Urban Grunge set, the Happy Anniversary is from a set of old text stamps and the whole thing is finished with a spray of Old Lace glimmer mist and an Alphabet washi tape.  I kept them to just the two layers as they both had to be posted this year - alas not in a gold post box this time!

Both children are settling well into their new schools - thank you everyone for all your kind comments, emails and texts - its been fun getting back into the swing of school life again this week - no doubt next week it will feel like they haven't had six weeks off at all!

I had a nice sewing afternoon yesterday and plan to spend most of today catching up with my quilt blocks for the dots hop I am in next Tuesday - hop starts next Monday, the full schedule is here so pop on over and join in if you fancy some looking at some lovely inspirational sewing pieces.  I also went out last night with my friend Ann to see a free preview of The Sweeney (I know, out on the town on a school night! it has been such a long time since I have been to the pictures must start going more often!).

Thanks for looking - Itching to get Stitching from Solihull

Wednesday 5 September 2012

And another ones goes


This time to a new Junior school:


this one is very excited about his new school adventure!  He will also still need to be taken and collected to and from school which means I still get to walk up and down the lane playing iSpy, looking for mushrooms and snails, jumping in puddles and occasionally, when it's not too muddy, walk through the jungle looking for elephants and tigers.  One of the main reasons why I have decided to be a stay at home Mom for just a little bit longer.

Here he is on his first day four years ago:


Bless him!

My eldest came home yesterday really happy - he loved his first day at big school despite all the worries beforehand!

Thanks for looking - Mom of now very relieved Senior school boy and a very excited Junior school boy from Solihull

Tuesday 4 September 2012

And he has gone

off to big school!


a little bit nervous but generally looking forward to it.  His friend has called for him and they have walked in together - bless.

Here he was on his first day in 2004:


Thanks for looking - Mom of Senior School Boy from Solihull

Sunday 2 September 2012

Winner again!

Imagine my excitement yesterday when I went over to T!ms blog to see his September tag and found out that I had been chosen as a winner for my August tag - this one here:


Whoo hoo!  I won a voucher to spend at Simon Says Stamp - which obviously I have gone and spent four times over before 7am this morning!

Yesterday I decided to have play and get on with my Sons request for a Darth Vader quilt - honestly children don't make things easy for you do they!

I have two yards of Star Wars patterned material that I bought in the States but my Son has decided that he would like a big Darth Vader in the middle!  So not to be put off  I went onto google images, found a picture of Darth that had outlines in white, printed it out on A3+ sized paper, pinned it directly onto a piece of black material and then just sewed straight over the top of the white lines with white thread and this is the result:


hasn't it come out brilliantly! I am really pleased with the results - just need to find the time to make it into a quilt now!

Well that's my eventful weekend so far, am now off to go and look at star quilting patterns to see what I can come up with for the rest of this Star Wars creation.

A big hello to both Janie and Ria - thank you both so much for following me!

Thanks for looking - Chuffed winner from Solihull